
Problem: trying to upgrade the stack switch C9300, but it failed because Switch 2 not enough space


Problem: trying to upgrade the stack switch C9300, but it failed because Switch 2 not enough space


Front panel components of a Cisco Catalyst 9300L Series switch
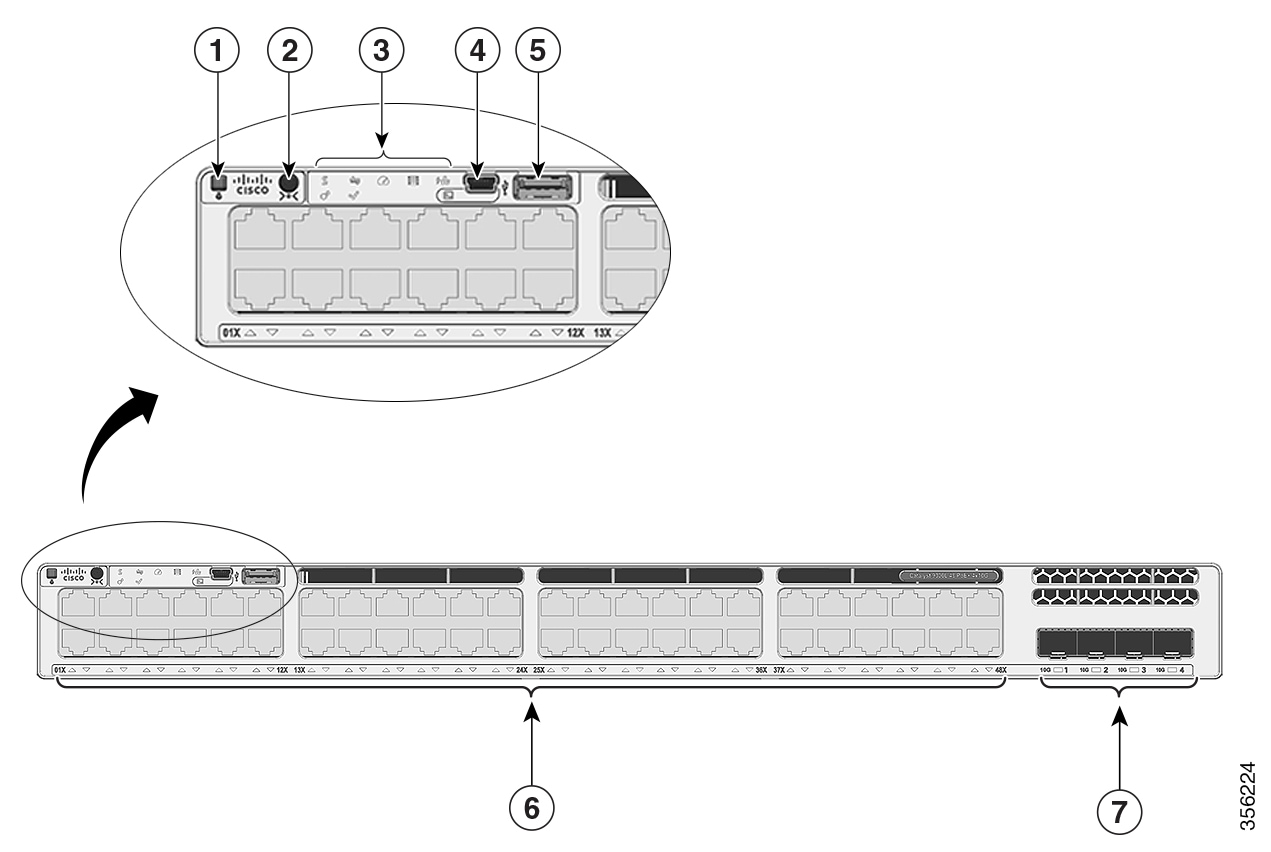
Figure 4. C9300L-48P-4X Switch Front Panel

1

Beacon LED (UID button)

5

USB Type A storage port

2

Mode button

6

10/100/1000 PoE+ ports

3

Status LEDs

7

Fixed uplink ports

4

USB mini-Type B (console) port

-

-


Solution: 

To run on the clean up on the master switch 
step1: make sure you back up the new IOS first, eg copy it to usb
step2: run command to do clean up, it will remove un use bin and packages files
           Switch# install remove inactive
Step3: copy back the new ios from usb to flash
Step4: Switch# install add file flash:cat9k_lite_iosxe.16.09.02.SPA.bin activate commit

- Switches will be upgraded and reboot


Comments

Popular posts from this blog

Recovering Fabric Interconnects When You Do Not Have Working Images on The Fabric Interconnect or The Bootflash

  Recovering Fabric Interconnects When You Do Not Have Working Images on The Fabric Interconnect or The Bootflash You can perform these steps when both or any fabric interconnect goes down during firmware upgrade, gets rebooted, and is stuck at the loader prompt, and you do not have working images on the fabric interconnect. Procedure Step 1 Reboot the switch, and in the console, press  Ctrl+L  as it boots to get the loader prompt. Note   You may need to press the selected key combination multiple times before your screen displays the loader prompt. Example: loader> Step 2 Configure the interface to receive the kickstart image through TFTP. Enter the local IP address and subnet mask for the system at the loader> prompt, and press  Enter . Example: loader> set ip 10.104.105.136 255.255.255.0 Specify the IP address of the default gateway. Example: loader> set gw 10.104.105.1 Boot the kickstart image file from the required server. Example...
  Upgrading an Old Nexus 3048 to Current NX-OS Posted on 2018/11/16 Yeah, I know. I’m supposed to be a Wi-Fi guy. However, I sometimes still have to touch routers and switches. I have some help for you if you need to upgrade some old Nexus switches. The Nexus 3048s are great DC caliber gig switches with proper front-to-back airflow. Used ones are really cheap and I think they make great management switches, which is what I’m using them for. If you have a Cisco Nexus 3048 with an older release of NX-OS on it, you need to go through several upgrades to get it to NX-OS v7. Here’s a walkthrough on the procedures. If you find you already on v6, for example, you can skip the 5.x step. Upon initial boot, you will need to abort Power-On Auto Provisioning. You will then be prompted for the admin password. Skip the basic configuration dialog. After a few moments, you will be able to login with the admin credentials you set during boot. I suggest downloading all the requ...

Cisco ISR4300, user credential is not working and password recovery disabled, How to recover the access to the router

Cisco 4331, user credential is not working and password recovery disabled Step by step solution to recover the access to the router  First, make sure you have a configuration backup because this following step will erase all the config Console to the router, using Terra Term Power cycle System Bootstrap, Version 11.1(4675) [kluk 143], INTERIM SOFTWARE Copyright (c) 1994-1996 by cisco Systems, Inc. C3600 processor with 32768 Kbytes of main memory Main memory is configured to 64 bit mode with parity disabled PASSWORD RECOVERY FUNCTIONALITY IS DISABLED program load complete, entry point: 0x80008000, size: 0x2733f4 When I see the word "Password Recovery Functionality is Disabled" Send CTRL Break  It will prompt a question to Reset to factory default PASSWORD RECOVERY IS DISABLED. Do you want to reset the router to factory default configuration and proceed [y/n] ? y Reset router configuration to factory default. It should boot to router prompt Now, you can re-configure it again...